
School of the Arts Week 8
Work Make-up Time
age: 7th - 10th grade
instructors: Madigan Young, Cari Ann Rasmussen, Sunhee Oberfoell, & Tyler Bubser
date: 4/20/22
Iowa Learning Standards:
Select, organize, and design images and words to make visually clear and compelling presentations. VA:cR2.3.8a
Develop criteria to guide making a work of art or design to meet an identified goal VA:Cr1.2.7a
Choose from a range of materials and methods of traditional and contemporary artistic practices to plan work of art and design. VA.Cr1.2.IIa
Learning Objectives:
By the end of the lesson TLW identify how to complete a painting or sculpture
By the end of the lesson TLW conclude their School of the Arts in-progress projects.
By the end of the lesson TLW describe how they want their work to be presented in the final exhibition.


Summary
For the final workshop day, we decided to give students a catch up day, as many of them didn’t completely resolve past projects. We also wanted to give students a chance to prepare their work for the exhibition themselves, so they could get a feel for finalizing work, making it look nice and so they could name their work. Students had choice in what they wanted to work on for the first 45 minutes of class. We had organized student work before class so they could look through and assess what they wanted to work on. Chloe, Maria and Brittany chose to complete their ceramic bust portraits (and I’m pumped they chose this.) Tony completed his grafitti name tag, and Clara chose to make a new print starting from carving a new block (inspired directly by Tyler’s teacher example, a print of her cat.) It was sweet to see Clara come in with a plan to work on print making. She even had a reference photo of her own cat, and her final product looked a lot like Tyler’s initial example so it was evident she enjoyed that work.
Since many of the students let us know ahead of time that they wanted to work on ceramics, Sunhee was prepared with more examples and she reviewed proportions and technique for the three students working on busts. I spent my time working on my own bust while the students worked which was fun. It also gave me a hands on perspective for what they were doing so I could give more clear feedback. Mainly however, it made me appreciate their final results even more.
45 minutes into the workshop, students began cleaning up and deciding which works they wanted to display in the exhibition at UAY. Each teacher guided one or two students in matting and labeling each work. I also encouraged students to display anything they were on the fence about. I enjoyed watching Chloe name her pieces. She asked if she could name her bust “Just a random bald dude,” which I loved. Most of the work was ready to go and packed in boxes by the end of class, ready to be taken to the UAY center next week.
Final Outcomes
Most of the work was ready to go and packed in boxes by the end of class, ready to be taken to the UAY center next week. Students completed, labelled and matted any work they wanted to display in their exhibition. I thanked all the students for attending the workshop and engaging with the lessons. Chloe gave me a hug, and I said I would look for her artwork throughout middle and high school and said she hoped to meet me again in the future. Another student even took photos of her work, showing pride and engagement which shows a lot of growth from her first workshop day with us.

School of the Arts Lesson 6 & 7
School of the Arts Lesson 6
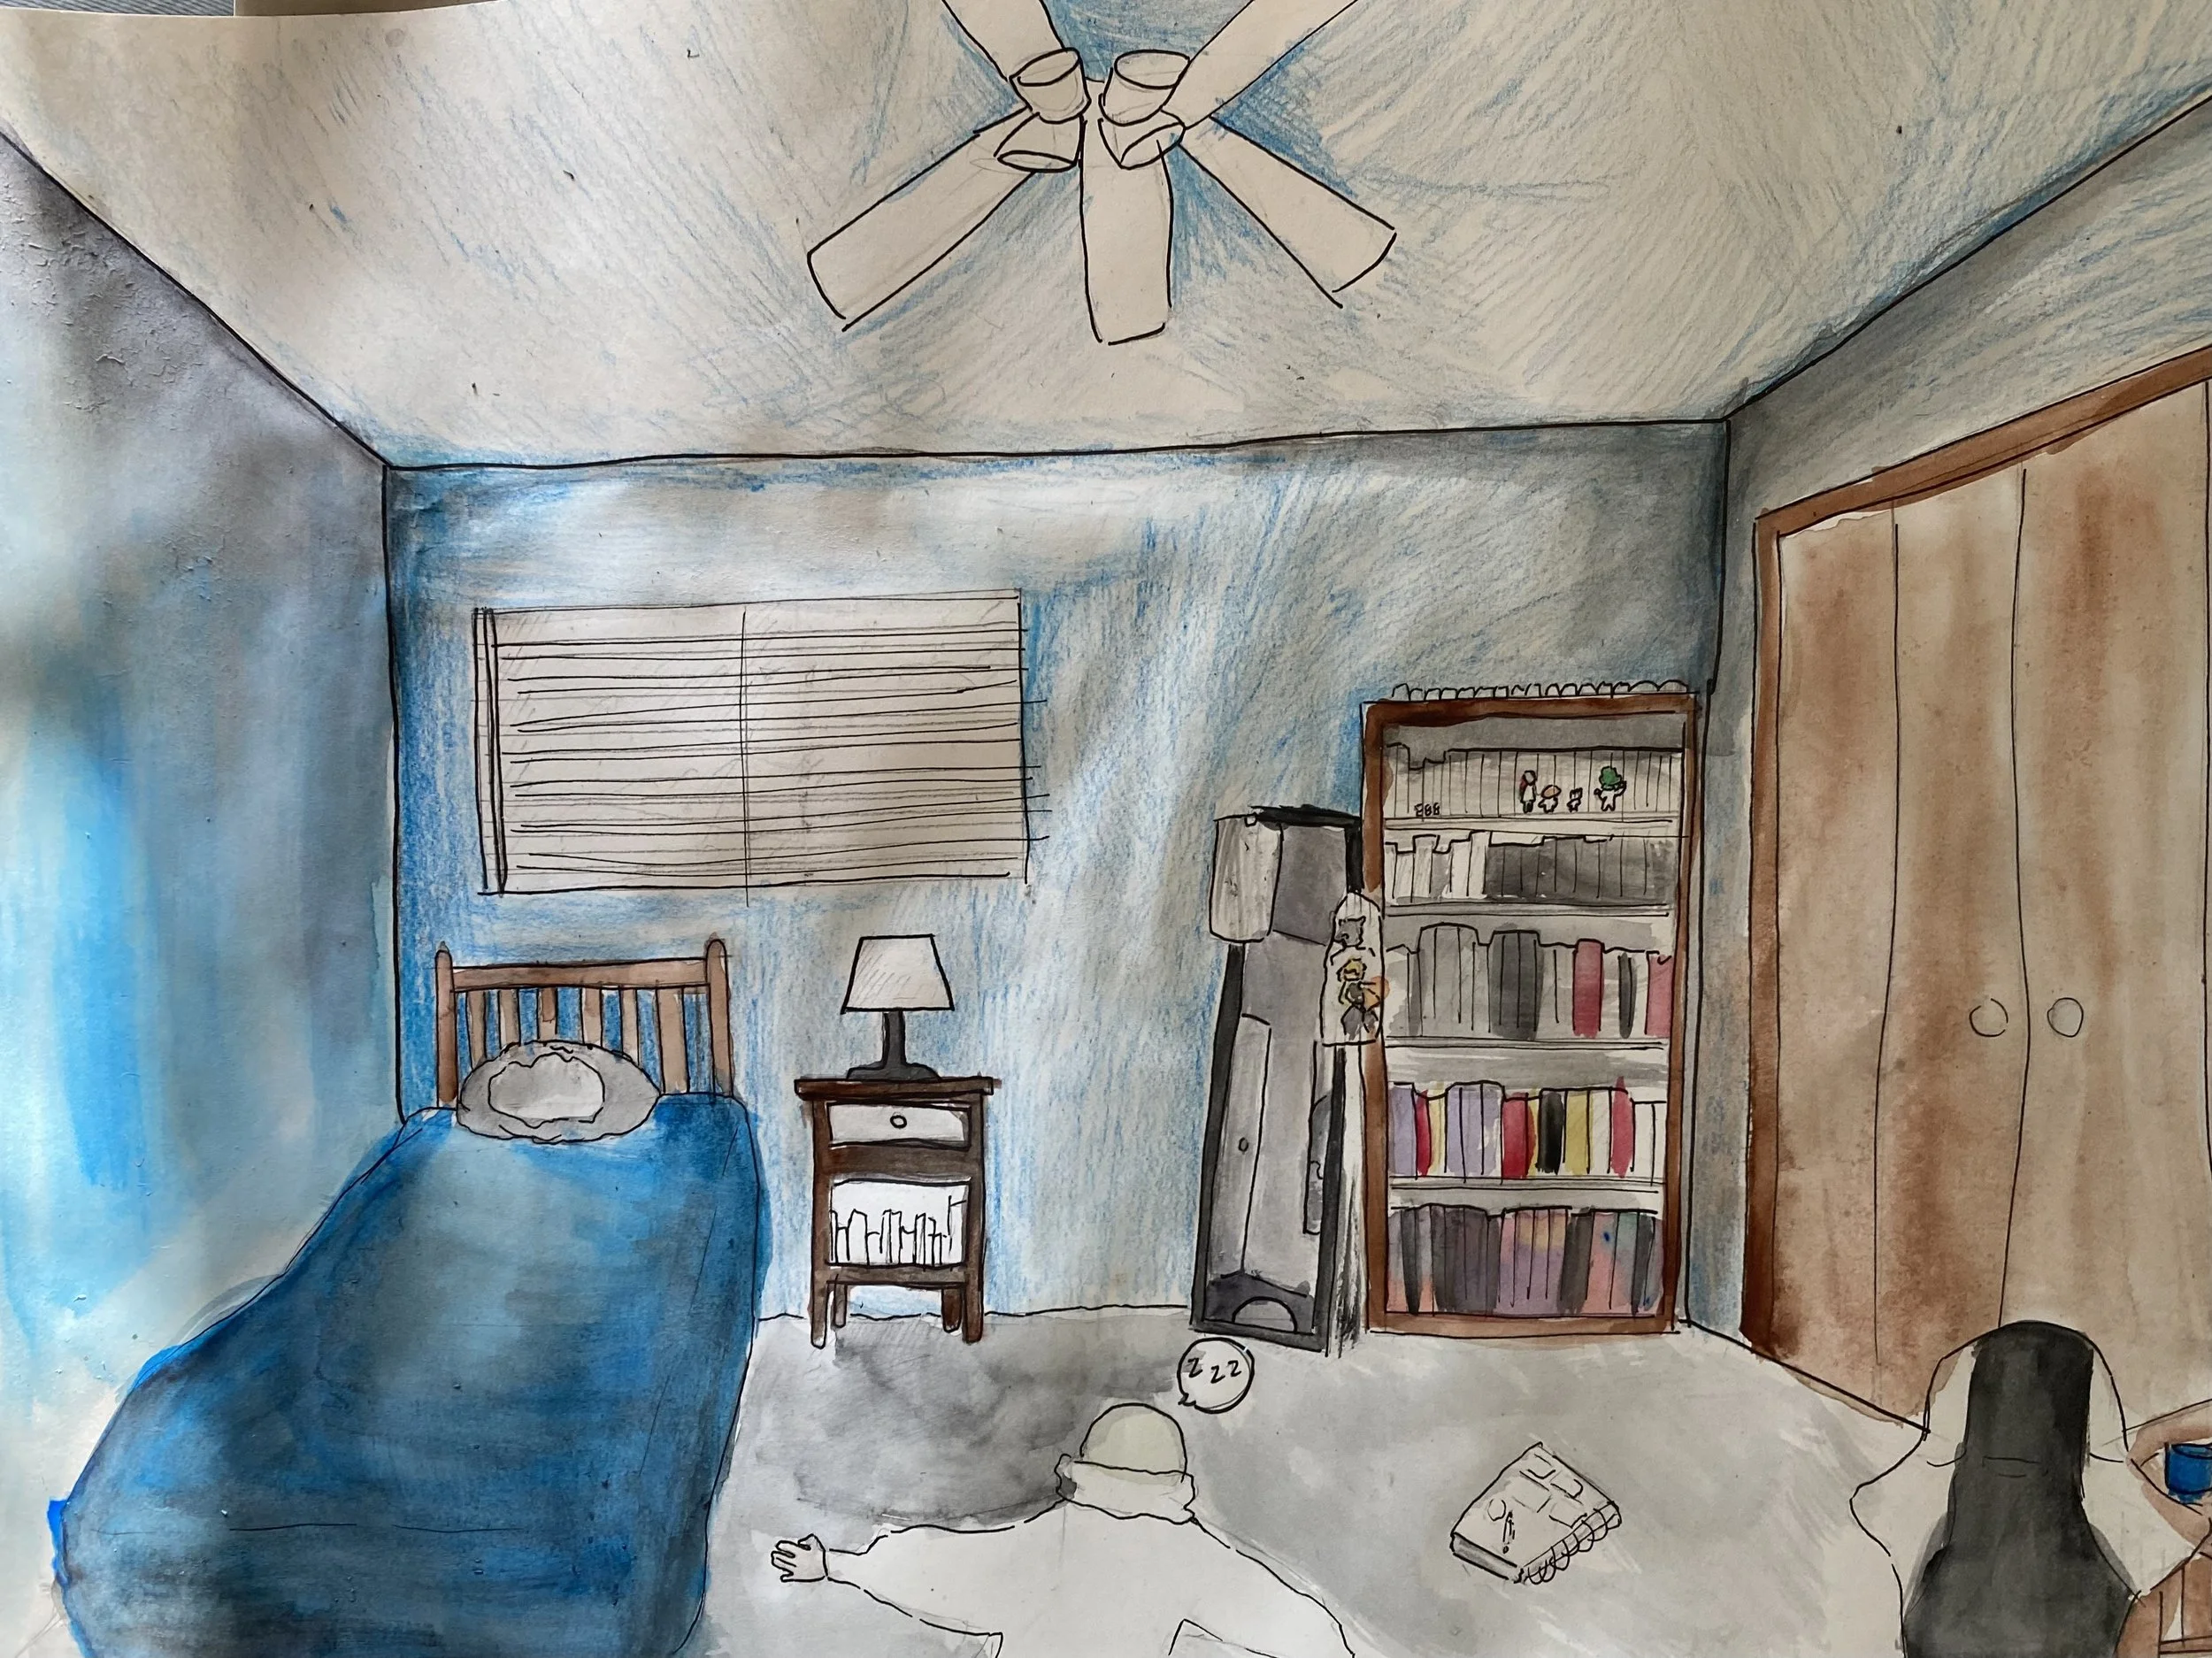
My Safe Space (Perspective Room Drawing)
age: 7th - 10th grade
instructors: Madigan Young, Cari Ann Rasmussen, Sunhee Oberfoell, & Tyler Bubser
date: 4/7/22 & 4/14/22


Iowa Learning Standards:
Coordinate production processes to integrate content and components for determined purpose and meaning in media arts productions, demonstrating understanding of associated principles, such as narrative structures and composition. MA:Cr3.1.7
Design the presentation and distribution of media artworks through multiple formats and/or contexts. MA:Pr6.1.8
Access, evaluate, and integrate personal and external resources to inform the creation of original media artworks, such as experiences, interests, and cultural experiences. MA:Cn10.1.I
Learning Objectives:
By the end of the lesson TLW apply drawing skills to a meaningful and well planned composition.
By the end of the lesson TLW describe a safe space that feels important in defining their identity, using visuals.
By the end of the lesson TLW design a three dimensional space in 2D using one-point perspective.
By the end of the lesson TLW arrange objects in a two-dimensional space.
Summary
Day 1
We began the lesson with a power point presentation introducing perspective drawing, showing artist examples and explaining what a safe space could be. I spoke first, just talking about what we were going to do that day and what the lesson would be. Next, Cari Ann defined what a safe space could look like and emphasized the lesson prompt. Then Tyler showed the artist examples, highlighting David Hockney’s use of two point perspective, Van Gogh’s use of one-point and Jordan Seaberry’s unique example of a perspective drawing. For the last part of the introduction Sunhee led a technical demonstration on how to draw using one- and two-point perspective, and how to use atmospheric perspective.
At this point, students were ready to start working. I was surprised at how quickly they all began drawing, they had each already generated ideas and chosen a place. During work time Cari Ann and Tyler also worked on a drawing. Sunhee went around taking photos and really instructing students on the technical details of perspective drawing. I focused on asking the students near me what their plan for the drawing was and how they felt about the technical parts. I tried to ask questions to help them settle on a plan of attack, rather than putting out suggestions. I also walked around to look at each student’s work and practiced saying encouraging and specific things about each drawing.
Day 2
Instructors set the table up ahead of time, with black markers, colored pencils and crayons. As soon as class began, students sat down and instructors handed out students’ drawings in progress. As students began working, I reminded them that next week would be a wrap up day and that they could work on anything from the past few weeks in addition to finalizing any work to prepare it for the UAY exhibition in a few weeks. As students continued working on their drawings, most found they were at the coloring in stage. Chloe and Rose asked if they could use watercolors. Last week, we as instructors discussed only providing colored pencils and crayons because we assigned a drawing and provided drawing paper. After having students request watercolors, we agreed to provide them. Cari Ann warned students that the paper would probably curl up and wrinkle as it dried. Most students still chose to use watercolors and began working. Cari Ann and I suggested placing paper weights on sides of the paper to alleviate some of the curling as the paint dried. SunHee showed a few examples of how to represent atmospheric perspective using color. As students worked, instructors checked in with students and continued working on their own examples. With 10 minutes of class left SunHee let students know they should begin cleaning up and finding ways to wrap up their drawing. After students cleaned up they kept their drawings/paintings out. I asked each student to share their work with the group, noting one thing they liked about the result, and one thing they would change.
Final Outcomes
Day 1
Most students had their room or landscape outlined and planned. We reminded them throughout the lesson that they would have an hour + next week so they could plan accordingly. With 10 minutes left, we had students clean up their area and then we gathered as a group to discuss progress. I asked each student to share the space they chose to work on and why they chose it, in order to assess how the prompt came across. Most students chose real places for one of two simple reasons- it was a place they dreamed of seeing (Paris, big gothic cathedral), or it was a familiar place they found comfort (bedroom, video game setting). This told me our prompt was a success because it could be interpreted uniquely by each student, giving them room to draw something they wanted to but also guided them toward a decision quickly. Next week I hope to assess how well we introduced and demonstrated perspective drawing.
Day 2
Each student shared willingly and showed their work. Rose’s painting stood out because she had to start fresh from the previous class. When she arrived to class her drawing from the week before blew out of her bag and into the Iowa River. Her new painting featured a dried up Iowa River in a gloomy, dismal setting reflecting the tone of how she felt about the river swallowing her drawing. There was a vast variety of results in style and subject. Half of the students followed the prompt to draw a safe space. Chloe drew her own room, Clara drew a familiar scene from a video game and Tony drew a peaceful city street. Rose’s original drawing of a cathedral lined up with the prompt, and the loss of that one inspired her new work. Brittany and Maria both drew more chaotic and random interior scenes that were interesting and possibly in line with the prompt with more explanation. All of the students used perspective with skill and intention. Students were focused throughout worktime and those who finished their work seemed happy with the final pieces.


School of the Arts Lesson 5
Sculpting a Human Face
age: 7th - 10th grade
lead instructor: SunHee Oberfoell
instructors: Madigan Young, Cari Ann Rasmussen, Sun Hee Oberfoell, & Tyler Bubser
date: 3/31/22
Iowa Learning Standards:
VA:Cr2.1.8a Demonstrate willingness to experiment, innovate, and take risks to pursue ideas, forms, and meanings that emerge in the process of artmaking or designing.
VA:Cr2.3.7a Apply visual organizational strategies to design and produce a work of art, design, or media that clearly communicates information or ideas
VA:Cr3.1.7a Reflect on and explain important information about personal artwork in an artist statement or another format.
Learning Objectives:
By the end the class, the learner will identify and create the primary structural aspects of shoulders, neck and head using clay
By the end of the class, the learner will define in clay the detailed facial features of eyes, nose, mouth, and ears.
By the end of the class, the learner will express one aspect of their identity using facial expressions in clay by changing the facial muscles and bone structure.
By the end of the class, the learner will sketch their self-portrait based on the golden ratio and proportions of face.


Summary
SunHee began the lesson by setting up the seating arrangements. Each spot had paper and a pencil, 3-4 playing card sized images of bust sculptures, and a name tag. She wanted the students to sit at their name tag spot instead of sitting with the same person as the past three weeks. The drawing paper allowed students to doodle during her presentation which is either a nice way to allow them to use their hands while they have to sit still, or a distraction from SunHee’s lesson. SunHee introduced herself and told the students they would learn how to sculpt a human face today. Then she dove into showing examples of some of her favorite sculpture artists, Franz Xaver Messenschmidt & Camille Claudel, in addition to showing her own work. She highlighted the way each artist used facial expression and body position to express certain emotions. Students practiced observing this by looking at their card images and writing what emotion they saw expressed in each bust sculpture.
The next part of SunHee’s lesson was about the technique of drawing, then sculpting the proportions of a human face. SunHee provided each studio with a packet showing the golden ratio of a human face, along with illustrations and instructions on drawing other parts of the face. This gave students a visual to copy while practicing. Students also had a mirror in front of them so they could use their own reflection as a model. After SunHee talked about the golden ratio and the proportions of the face, she had students start to practice a quick, undetailed, but proportional drawn bust of themselves. Once everyone had time to draw, SunHee moved on to how to sculpt using the same proportion rules. She talked about what a bust sculpture is and what a relief sculpture is. Then, she showed videos of a sculptor creating a bust and a relief of a human face. One thing she kept reminding students of was that the head is egg shaped, since that’s where the starting point is. Before having students dive into worktime, SunHee demonstrated how to begin a bust sculpture.
The final part of class was work time to sculpt a bust or relief portrait with clay. The instructors handed out 4 lbs of clay to each student, along with a cup full of ceramics tools. Instructors helped show students how to cut sections off using the wire tool and students began to shape their bust or relief portraits. Due to the lack of time, SunHee reminded students to focus mostly on proportions today, rather than details and nuances.


Final Outcomes
Each student ended up reaching a point where their bust had head, neck and shoulders shaped and features like eyes, nose, mouth and ears. A few students had added hair to theirs, but none quite had time to add details or think much about facial structures like cheekbones, dimples, etc. All students emphatically nodded when we asked if they were interested in saving the busts to continue working in our last week of the workshop. This response, in addition to the proportional and thoughtful sculptures that they had started, showed engagement and enjoyment with this lesson and medium. We ended the lesson first by spraying the busts with water and wrapping them up in plastic to preserve the malleability. Then, SunHee gathered the students to conclude the lesson. She asked if students were prompted to think about the expression of their sculptures, and how they would sculpt different muscles and features to achieve the expression, as they worked. Then she asked how they felt about this lesson. Students said they found working in 3D and with clay challenging but fun.

School of the Arts Lesson 4
Personality Postcard
age: 7th - 10th grade
instructors: Madigan Young, Cari Ann Rasmussen, SunHee Oberfoell, & Tyler Bubser
date: 3/24/22

Iowa Learning Standards:
VA:Cr2.1.8a Demonstrate willingness to experiment, innovate, and take risks to pursue ideas, forms, and meanings that emerge in the process of artmaking or designing.
VA:Cr2.3.7a Apply visual organizational strategies to design and produce a work of art, design, or media that clearly communicates information or ideas
VA:Cr3.1.7a Reflect on and explain important information about personal artwork in an artist statement or another format.
Learning Objectives:
By the end of the lesson TLW identify and describe at least one of the contemporary artists that were shown during the introductory PowerPoint for this project.
By the end of the lesson TLW express an idea or statement through visual representations/symbols.
By the end of the lesson TLW demonstrate ability to use linoleum cutter and ink roller.
By the end of the lesson TLW apply two personal symbols to the composition of their personality postcard.

Summary
Tyler opened the lesson by introducing what students would be creating, “personality portraits,” using printing materials. Then she showed examples for style and subject from Daniel Arzola and Kehinde Wiley, and examples of the print medium from Elizabeth Catlett.
The warmup activity included a discussion of symbols. Tyler showed a peace sign and a heart and asked students what these symbols represented. Then she showed white and red roses to prompt discussion about how colors can symbolize different things, in addition to images.
Tyler asked students to generate a list of words and phrases that relate to their identity. Once they had a list, she had them draw symbols that represented a few of the words.
Tyler ended the discussion/presentation to move to a partial demonstration of printmaking. Cari Ann asked everyone to move over to the demonstration table so they could see the examples. She showed students the materials (including the rubber block, brayer, ink) and several examples of prints made in the same way as the students would be creating their own prints. She explained that they would draw out their design and transfer it directly to the block by placing the drawing facedown, and rubbing the paper to transfer the graphite onto the block. She told students from there they could carve out their design. She reminded them that where they carved out would be the white space. Tyler’s examples were nice because she showed students the final print next to the block that she carved out so they could see the way negative versus positive space turned out. I asked students who had experience with print making- one student was currently taking a printmaking class while most of the group was new to the process. This was helpful to know who might need more or less support in the technical aspects of the process.
Students began working on their final sketches for the print. They led the way in asking to trace the rubber blocks so they would know how large to make their drawings. I’m not sure if their final designs were based on symbols they created from their word lists but I would be interested to look back at the planning process. We moved quickly from silent brainstorm time to demonstration so instructors didn’t really check in with students during the brainstorm time until we got to the final planning stage.
Once students completed their sketch they wanted to print, they showed an instructor and we provided the block. Instructors introduced students to the carving process one by one and showed them the tools. I worked closely with one student and showed her the tools, let her know the options for carving tools, demonstrated carving a few lines and let her try on a practice block. Then, I continually checked in as she worked and asked questions about how she felt about it, made specific complementary comments on her work and answered any questions she had. Meanwhile, Tyler also showed students, individually, how to carve prints and SunHee and Cari Ann also walked around and checked in with students. Once students finished their carvings, which took a lot less time than I thought, probably due to the 4x6” size, they showed an instructor again. Tyler set up a table that turned into the printing table where students applied ink and pulled their prints. She demonstrated how to apply the ink and pull the print again to each student individually.
Students mixed their own ink colors and pulled 3-4 prints each. All instructors cleaned the brayers and set them out to dry. Students signed their prints and put them on the shelves to dry.

Final Outcomes
Students ended up with a few postcard sized prints, possibly with a personal symbolic meaning behind the image. Students experimented with applying different colors to different parts of the printing block, and mixing new colors. Students also pulled an initial print and tweaked their carving based on the results, then pulled new prints.


School of the Arts Lesson 3
It all begins with an idea.
Pieces of You- Paper Mosaic Portraits
age: 7th - 10th grade
instructors: Madigan Young, Cari Ann Rasmussen, Sun Hee Oberfoell, & Tyler Bubser
date: 3/10/22

Iowa Learning Standards:
· Demonstrate persistence in developing skills with various materials, methods, and approaches in creating works of art or design. 2.1.7a
Explain how a person’s aesthetic choices are influenced by culture and environment and impact the visual image that one conveys to others. 7.2.8a
Interpret art by analyzing artmaking approaches, the characteristics of form and structure, relevant contextual information, subject matter, and use of media to identify ideas and mood conveyed. 8.1.7a
Learning Objectives:
By the end of the lesson TLW compose a single pattern or visual image made up of 8 or more smaller pieces, colors and patterns.
By the end of the lesson TLW examine their peer’s work and summarize how the work evokes tone or emotion.
By the end of the lesson TLW take part in mindfully reflect on how both the process and the result impact what students believe belongs in a self-portrait.
By the end of the lesson TLW adapt the way they represent themselves and change the definition of what a self-portrait could be.
Summary
I opened the lesson by introducing what students would be creating and holding up my example. I noted that students might end up with a more traditional collage or a more mosaic style aesthetic. Then, I introduced the agenda which included
warm-up drawing
art/artist introduction
planning
work time
Then, I put the drawing prompt that read “Draw an object or being that represents an aspect of your personality,” up on the board and asked everyone to take 5 minutes to draw. I had students share their drawing with the peers and teachers at their own tables- specifically talking about why they chose to draw it.
Next, I introduced the 4 artist examples. For the first two I asked what the images made them think of. For the Tsvaris “The Water Girl” digital mosaic, students said it reminded them of legos and bricks and had patterns like beads or jewelry. Then I responded with context. Tsvaris’ “The Water Girl” was actually made up of the brick like rectangles to represent brick houses in Africa, which the subject represented. The bead like patterns represented more aspects of her African heritage. All of the different aspects of the image contributed to the idea of the image as a whole. I found the discussion easily clicked with the students.
I repeated the same questions and format with the next image, Alma Thomas’ “Snoopy,” and generated a similar conversation around how the colors and shapes of the painting contributed to the inspiration behind it.

I showed the last two artist examples to have a variety of inspiration for students. I noted that the idea of putting a collage or mosaic of things together was to use small things that mean something - whether it’s individual patterns or pictures, or simply certain colors, to create one larger meaningful image.
Then I introduced the parameters of the lesson.

Most students began sketching ideas out, some hit an artist’s block. Myself and fellow teachers prompted their thinking with questions or suggested they start by going through the available paper and images for inspiration.
As the lesson went on students were more engaged and invested in what they were creating. The work time became more natural and flowed nicely with music playing in the background and instructors continually checking in with students even as they created their own.
With 15 minutes left we started cleaning up, and some students began putting final touches on their work, signing it, etc. Other students gathered the scraps they collected and put them in a bag for later. We collected the work and bags and put them away for another time. Students left at their own pace and we bode them goodbye individually, more casually than a formal class conclusion.
Final Outcomes
Most students didn’t complete their paper mosaics before time was out. However, they did enjoy the activity and found that it was challenging and fun to explore new ways to create. Several students have drawing narratives/themes that they repeat a lot. Collaging paper gave them a new way to express some of those images and themes. Not being familiar with this style of making also led to new discovery and surprises.


School of the Arts Lesson 2
It all begins with an idea.
Make a Name Tag: Creating your own grafitti tag.
age: 7th - 10th grade
instructors: Madigan Young, Cari Ann Rasmussen, Sun Hee Oberfoell, & Tyler Bubser
date: 3/3/22
Standards:
Choose from a range of materials and methods of traditional and contemporary art practices to
plan works of art and design. VA.Cr1.2.IIa
Through experimentation, practice, and persistence, demonstration acquisition of skills and
knowledge in a chosen art form. VA.Cr2.1.IIa
Apply visual organizational strategies to design and produce a work of art, design, or media
that clearly communicates information or ideas. VA.Cr2.3.7a
Learning Objectives:
By the end of the lesson, TLW demonstrate the use of Line, Color, and Composition when drawing their own Graffiti tag.
By the end of the lesson, TLW identify graffiti tags in Street Art.
By the end of the lesson, TLW design and create their own graffiti tag using their name using drawing materials, such as markers, colored pencils, oil pastels, etc.
Summary
The lesson began with a power point presentation by Cari Ann. She introduced some vocabulary around graffiti and graffiti tags, then showed her 3 artist examples. Next, she introduced bubble letters and font categories often used and described what students would be doing during the lesson. She asked students to use at least two different mediums (colored pencil and oil pastel or marker and colored pencil) in their final creation.
Students began by creating 3 sketches, as suggested by Cari Ann, using paper and pencil. Teachers joined in doing their own sketches but also conversing with students about their plans for their final tag. Students collected and teachers handed out materials for the final tag- larger paper, markers and colored pencils. Students began their final tags. As they colored their name tags, the students on my half of the table were lively and talkative throughout. They shared how they felt the tag was coming along in addition to talking about other random things like the music they love to listen to. The student next to me experimented with symbols in her graffiti tag and used watercolor in addition to the drawing materials. Another student ran out of color in a marker they were using, so decided to try several colors on each letter of the tag which turned out more interesting.
Most students were nearing completion when we ran out of time.
Final Outcomes
Two (out of seven) of our students were more quiet, though not necessarily less enthusiastic about the lesson. They created several smaller name tags, including color so I’m not sure if they were still sketching or liked the smaller format with several different tags on a page. I would say three out of the other four embraced the project fully and more the way Cari Ann instructed it. Another student participated fully but didn’t quite try out the lesson plan based on the parameters Cari Ann laid out. She illustrated something she typically doodles but didn’t change the style- just made her artist signature larger. I thought it was successful as a visual but not sure it communicated the graffiti/street art style so it didn’t necessarily meet the third learning objective. Three of the students had more classic examples of graffiti tags. One student’s work stood out to me as excellent as far as reflecting the fact that they were looking at graffiti styles for inspiration. They were excited about making the letters overlap in a way that wasn’t easily legible and successfully gave the letters a lot of dimension. Excitement/engagement with the lesson shone when the students asked when/if they would have further time to work on their tags.


School of the Arts - Group Lesson 1
Splatter Collab: Creating an uplifting and experimental splatter painting as a group.
age: 7th - 10th grade
instructors: Madigan Young, Cari Ann Rasmussen, Sun Hee Oberfoell, & Tyler Bubser
date: 2/24/22
Learning Objectives:
Collaboratively shape an artistic investigation of an aspect of present-day life using a contemporary practice of art and design. VA.Cr1.8a
Choose from a range of materials and methods of traditional and contemporary artistic practices to plan works of art and design. VA.Cr1. 2. IIa
Apply visual organizational strategies to design and produce a work of art, design, or media that clearly communicates information or ideas. VA.Cr2.3.7a
Elaborate on an imaginative idea. VA: Cr 1.1.3a
Lesson Summary:
We began the lesson with introductions of the instructors, followed by introductions from the students. We asked the students for name, favorite shape and favorite season of the year as a low pressure ice breaker.
Next, we showed images of three splatter painting examples, from artists Jackson Pollock, Sadrin Molina Cortez (street artist), and Caroline Vis, to generate visions of what splatter paintings can look like and to represent a diverse group of working artists.

Jackson Pollock, Convergence, 1952, oil on canvas.
Next, we introduced the lesson itself- that we would create a splatter painting as a group. To make the painting more meaningful + personal, and get to know the group, we also told students we would tape the canvas before painting so they could write positive words and phrases in the spaces later. We showed and talked through two examples. We mentioned that we would later introduce prompts to guide brainstorming of what to put on the canvases.
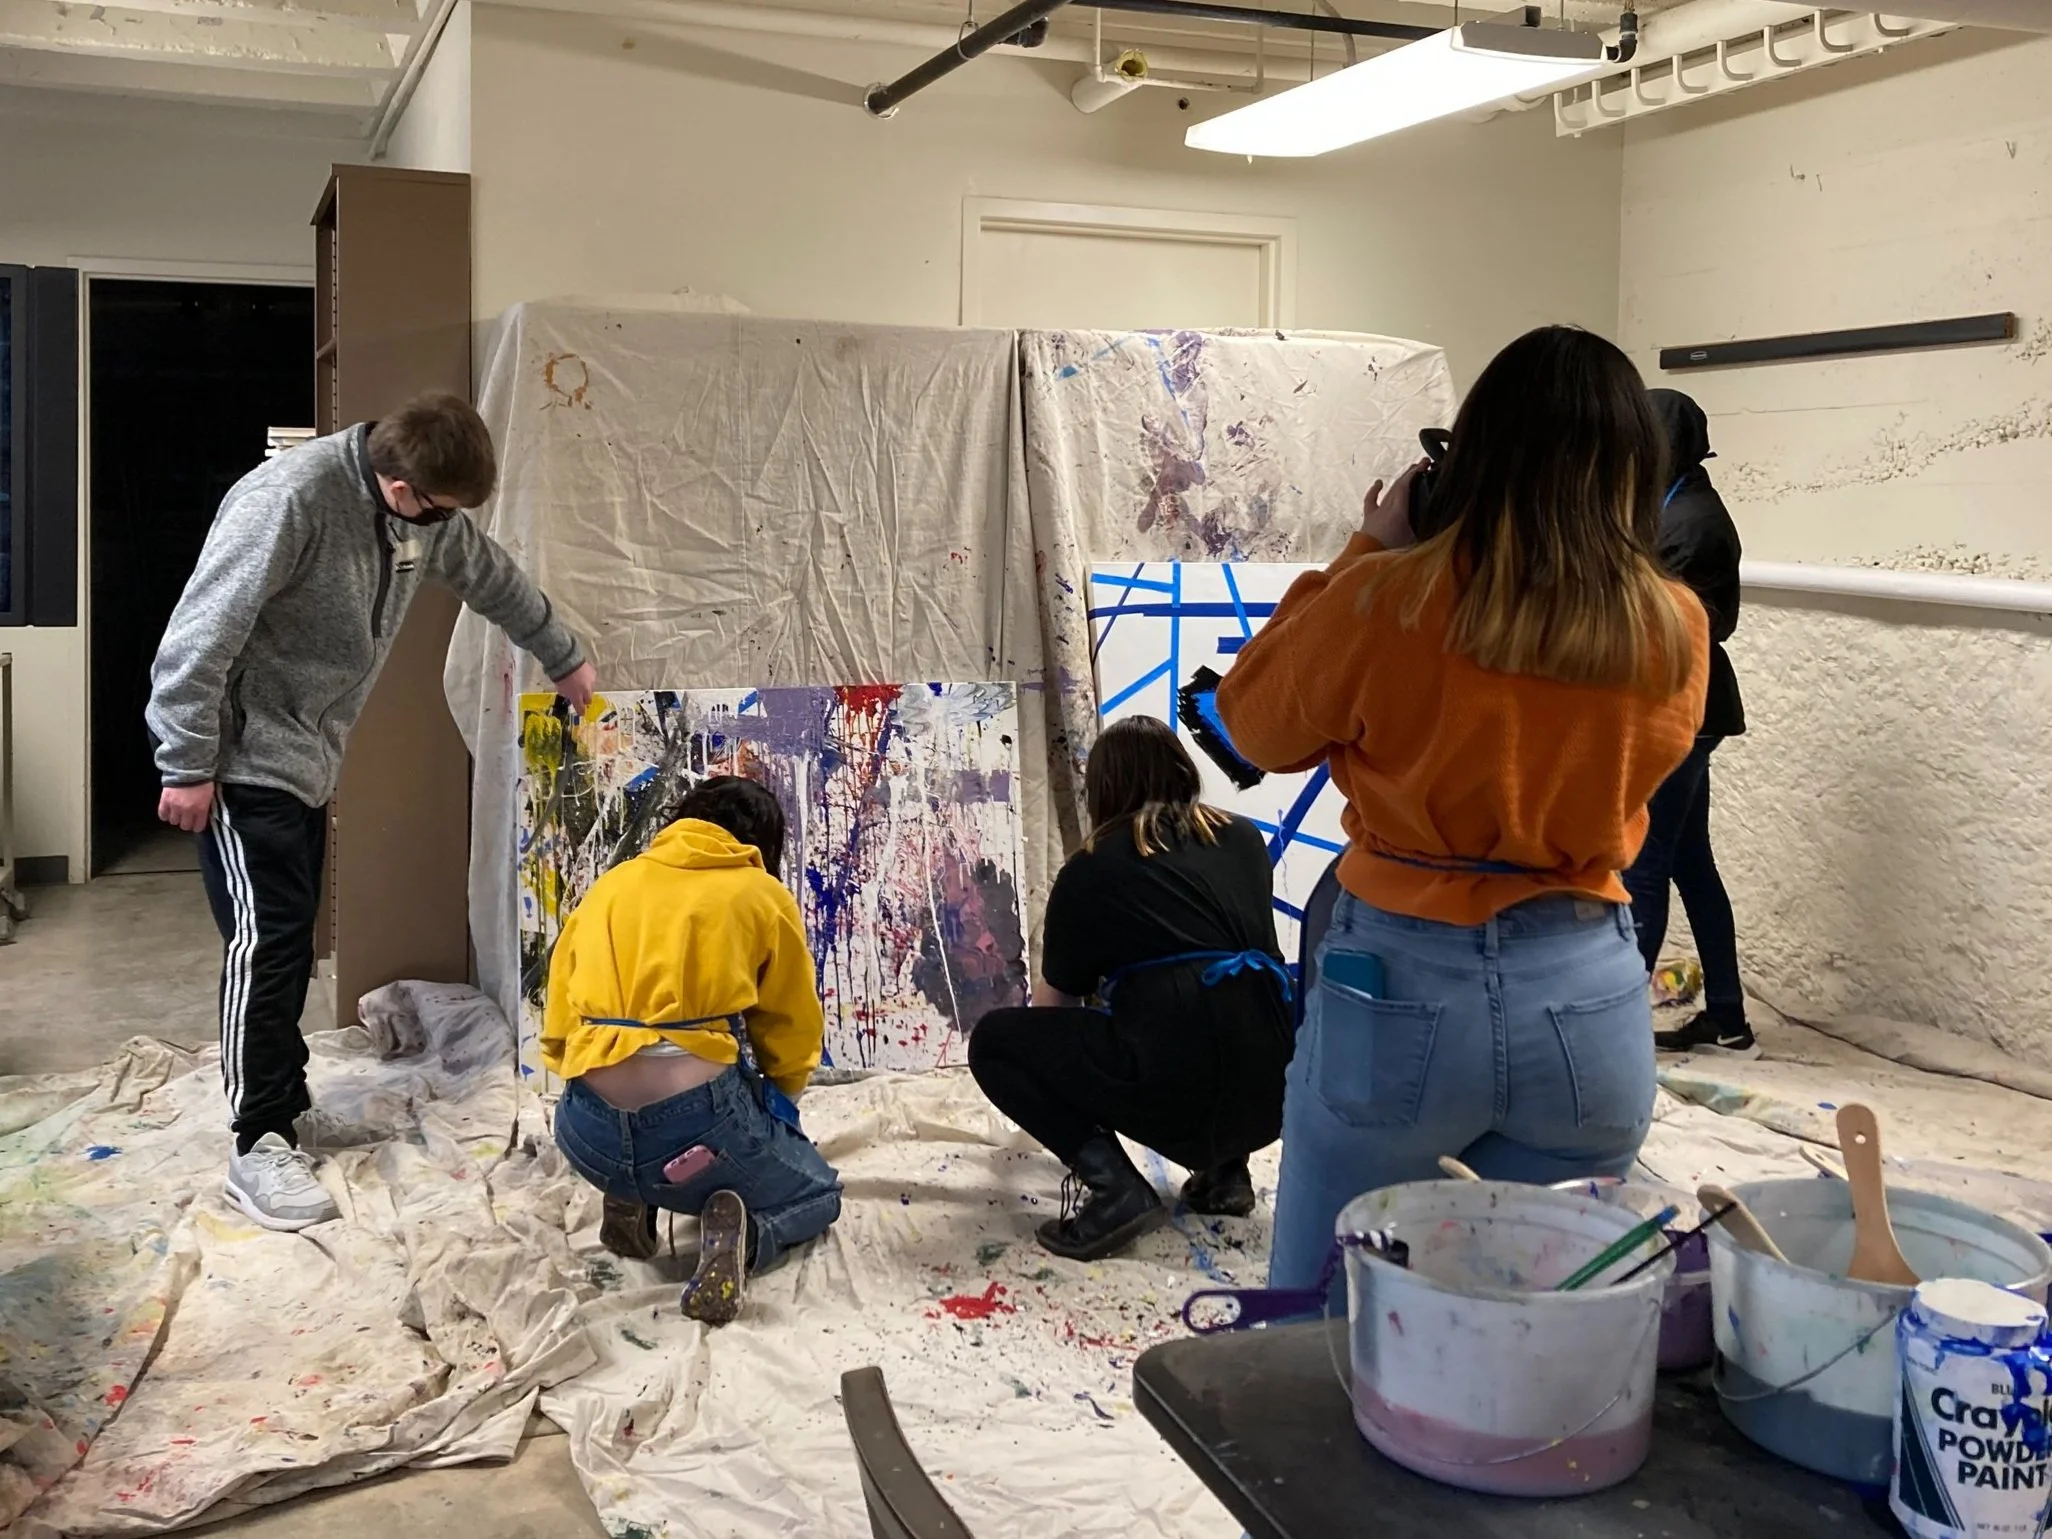
Time to create! On two canvases, students began taping lines across the surface. On one, they decided to do a heart in the center, with tape lines all around, the other was strictly abstract. Then, students began to select colors and tools of their choice and experiment with ways to throw paint on the canvas. As the lesson went on, students moved closer and further from the canvas as they painted, they mixed colors to get new hues they wanted. As the canvases became covered fully in paint, I asked students how they felt, and what if anything needed to be added. Students experimented with brushing black spots across parts of the canvas to then splatter white or lighter colors on top. They added a few more colors and splatters until every student agreed it felt complete. Students began cleaning up and then went to get a snack while instructors finished clean up.
While the canvases dried, students returned to their tables and Sun Hee and I introduced writing prompts to generate positive words and phrases. We read the prompts one by one, giving students a chance to write words, sentences or doodles on drawing paper. After we went through the prompts I asked students to share what they wanted to get out of school of the arts, and what kinds of art they made (two of the prompts.) Time was up, so we gathered the responses to save for next week. We concluded by thanking the students, and letting them know next week we would pull the tape off the canvas and write in the spaces to complete the work.
Teaching methods that occurred included demonstration of using spoons or string to splatter paint, so students felt free to experiment and go outside the box. Asking students what they felt was successful as they were working and encouraging them to do more or try something new as they painted. The students were on the quiet side from the start so having instructors participate and encourage helped them feel more welcome to take charge of the painting and try whatever came to mind. The only specific resource used was a power point slide for writing prompts, images and introduction, along with a physical miniature example of what the final splatter painting could look like (one created by Cari Ann and one by Sun Hee). Sun Hee’s example included variations in brushstroke, splatter painting and doodles along with words to show students how diverse and interesting the painting could turn out to be.

Final Outcomes:
After giving the paintings a week to dry, we peeled the tape off as a class. Then, students and instructors wrote positive words and phrases about UAY and School of the Arts, and we signed our names. Over the next few weeks we had other groups add their own drawings and words.
